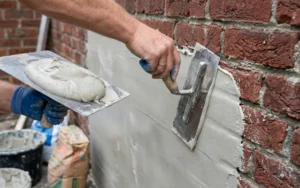
Damp walls destroy plaster, rot timber, and trigger serious health problems — yet most UK homeowners attempt the wrong treatment because they misidentify the cause. Treating the surface without fixing the source is the single biggest mistake people make, and it guarantees the problem returns.
In this guide, we walk you through exactly how to treat damp walls internally in the UK — from diagnosing the damp type correctly, right through to permanent damp wall repair, replastering, and long-term prevention.
Quick Reference: Internal Damp Wall Treatment by Type
| Damp Type | Core Cause | Internal Treatment | DIY Possible? | Time to Fix |
|---|---|---|---|---|
| Condensation | Poor ventilation, low heat | Extractor fans, dehumidifier, anti-mould paint | Yes | Days to weeks |
| Rising Damp | Failed or missing DPC | Chemical DPC injection, replaster with salt-retardant plaster | Partially | Weeks |
| Penetrating Damp | Leaking roof, gutters, cracked walls | Fix external source first, then dry and repaint internally | Yes (minor) | Weeks |
| Plumbing Leak Damp | Burst or leaking pipe behind wall | Fix the leak, dry out, replaster if needed | Yes | Days |
Step 1 — Diagnose the Type of Damp Before You Do Anything Else
Before you buy a single product or lift a paintbrush, identify what type of damp you are dealing with. Otherwise, you will waste time and money on the wrong treatment entirely.
Here is how to tell each type apart:
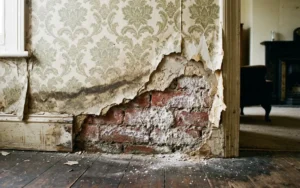
Rising dampness in walls appears as a horizontal “tide mark” stain low on the wall — usually no higher than one metre from the floor. You will also notice white salt crystals blooming on the surface, and plaster may bubble or crumble away from the brickwork underneath. This damp type always affects ground-floor rooms and generally worsens during wet weather.
Penetrating damp, however, appears on any level of the building. It typically creates damp patches on external-facing walls that worsen noticeably after rain. The patches often feel cold and damp to the touch, and they may grow outward rather than upward. Because the water travels along hidden paths inside the wall, the visible patch is often not directly above or below the actual entry point.
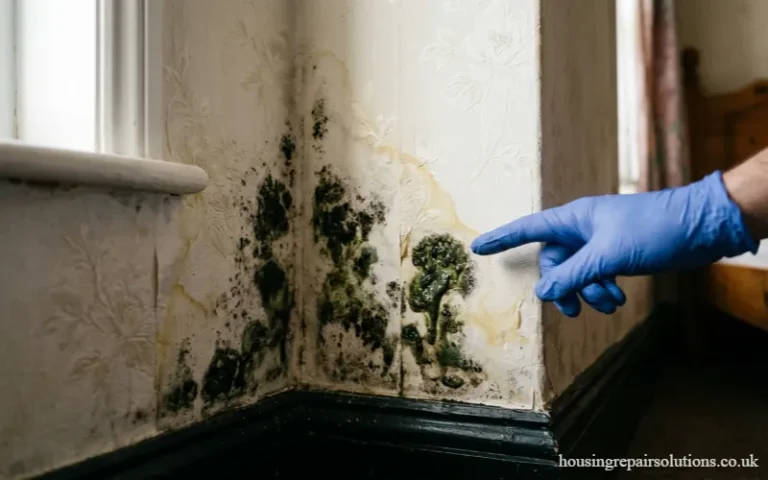
Condensation, by contrast, produces black mould speckles on cold surfaces — usually external walls, window frames, and corners. It tends to appear in winter, improves in summer, and is most severe in rooms with poor air circulation, such as bedrooms and bathrooms.
Plumbing leak damp creates an isolated, often circular wet patch that bears no relation to rainfall or season. If you notice the wet patch near a pipe run, a radiator, or a bathroom fitting, suspect a plumbing leak first.
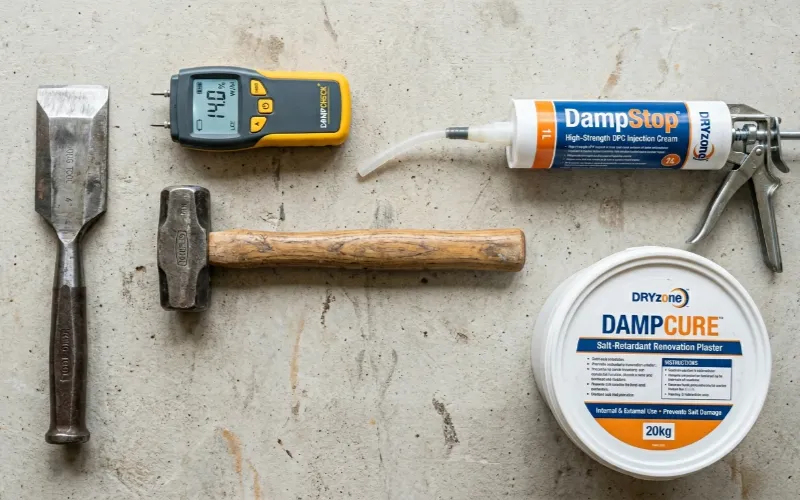
Tip: Use a moisture meter to measure dampness levels in the wall before and after treatment. This gives you a clear baseline and helps you confirm when the wall has dried out sufficiently for replastering.
Step 2 — Fix the Source Before Treating the Wall Internally
This step is non-negotiable. Treating the internal wall surface before fixing the underlying cause will fail every single time. Moisture will push straight back through any coating, paint, or plaster you apply.
For condensation: Improve ventilation immediately. Install humidity-controlled extractor fans in bathrooms and kitchens, open windows daily, and maintain a background temperature of at least 18°C in all occupied rooms. Additionally, run a dehumidifier in the most affected room until humidity drops below 60%.
For rising dampness in walls: You need to either repair or install a new chemical damp-proof course (DPC). A functioning DPC creates a waterproof barrier inside the wall structure that stops ground moisture from travelling upward through capillary action. Without a working DPC, no internal treatment will provide lasting results.
For penetrating damp: Carry out all external repairs first — repoint cracked mortar, fix broken guttering or downpipes, repair damaged roof tiles, and seal gaps around window and door frames. Only after you resolve the external water entry point can you move on to internal damp wall repair.
For plumbing leaks: Locate and fix the leak — even a slow drip behind a wall can saturate a large area of plasterwork over time. Then allow the wall to dry completely before assessing the damage.
 How to Damp Proof a Wall Internally: Treatment Methods Explained
Once you have fixed the source, several internal treatment options are available depending on the severity and type of damp you are dealing with.
Chemical DPC Injection (Rising Damp)
Chemical DPC injection is the most reliable and widely used method for treating rising dampness in walls across the UK. Here is how the process works:
- Remove all affected plaster back to the bare brick or blockwork. This is essential because old plaster holds hygroscopic salts that continue attracting moisture even after you install the new DPC.
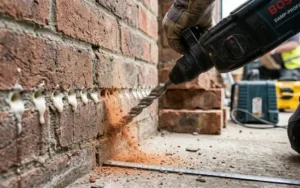
- Drill a row of holes at approximately 150mm from floor level into every mortar joint, spacing them around 120mm apart horizontally.
- Inject damp-proofing cream into the holes from the back forward, filling each hole completely. The cream disperses slowly through the mortar and cures to create a water-repellent silicone barrier.
- Allow the cream to cure for the manufacturer’s specified period — typically 24 to 48 hours — before replastering.
- Replaster using salt-retardant renovation plaster to a height of at least one metre. Standard plaster will re-absorb the hygroscopic salts from the masonry and fail prematurely, so this step is critical.
If you rent your home and your landlord is responsible for rising damp repairs but has failed to act, you may be entitled to compensation. Read our full guide on common housing disrepair issues and your rights as a tenant.
Damp-Proof Membrane (Rising or Penetrating Damp)
A damp-proof membrane (DPM) creates a physical barrier between the damp masonry and the new internal surface. You can apply it in two forms:
Cavity drain membrane — a studded plastic sheet that you fix directly onto the damp wall using plugs. The air gap created by the studs allows moisture to migrate downward to a drain channel rather than pushing through to the room. This solution works particularly well in basements and below-ground rooms where full waterproofing is impractical.
Tanking slurry — a cementitious waterproof coating that you brush or spray directly onto bare masonry. You apply tanking slurry in multiple coats, and it bonds chemically to the wall to block moisture ingress. Furthermore, tanking is the preferred treatment for damp proofing internal walls in cellars and older stone-built properties.
Anti-Mould Paint and Damp-Seal Coatings (Condensation and Surface Treatment)
Anti-mould paint and damp-seal primers do not fix structural damp — however, they serve a genuine purpose as the final layer of protection after you address the underlying cause.
Apply a damp-seal or stain-blocking primer first to stop old tidemark stains bleeding through your fresh emulsion. Then apply two coats of anti-mould emulsion. This combination resists future mould growth on the wall surface and keeps your finish looking clean for significantly longer than standard emulsion alone.
How to Remove Dampness from Walls: The Full Internal Repair Process
Now that you understand the treatment options, here is the complete step-by-step internal damp wall repair process from start to finish.
Stage 1 — Prepare the Area
First, lay dust sheets over the floor and move all furniture well away from the affected wall. Next, turn off any electrics near the area you plan to work on. Good preparation prevents costly accidental damage and makes the job far safer.
Stage 2 — Remove All Mould from the Surface
Before you strip any plaster, treat visible mould on the surface. Mix one part bleach with six parts water, or use a proprietary mould remover. Wearing gloves, a face mask, and eye protection, wipe — do not brush — the solution onto the affected area. Brushing releases mould spores into the air and spreads the problem to other surfaces.
Allow the solution to sit for 10–15 minutes, then wipe the area clean with a damp cloth. Seal all cleaning materials in plastic bags and dispose of them immediately.
Stage 3 — Strip the Damaged Plaster
Use a bolster chisel and club hammer to remove all affected plaster back to the bare masonry. Take the plaster removal at least 300mm beyond the visible edge of the damp area on all sides — damp travels further than the visible patch suggests.
For rising damp, remove plaster to a height of at least one metre from the floor. Hygroscopic salts contaminate plaster far beyond the visible tide mark, so cutting back generously here saves you from repeat problems later.
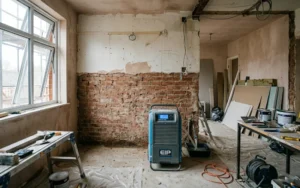
Stage 4 — Allow the Wall to Dry Thoroughly
After removing the plaster, the exposed masonry needs to dry out completely before you apply any treatment or new plaster. This is one of the most skipped steps — and skipping it is a costly mistake.
Place a dehumidifier directly in front of the wall and leave it running continuously. Also keep the room heated and well ventilated throughout the drying process. Depending on the wall thickness, construction type, and severity of dampness, drying can take anywhere from two weeks to several months.
How to know when the wall is dry enough: Use a moisture meter to take readings. In general, brick and masonry should reach a moisture content below 4–5% before you begin replastering.
Stage 5 — Apply Your Chosen Damp-Proofing Treatment
Now apply the appropriate treatment based on the damp type you identified in Step 1. For rising damp, inject the chemical DPC. For penetrating damp combined with rising damp, you may need both a DPC injection and a bonding coat of waterproof render before replastering. For condensation walls, a tanking coat or primer is sufficient at this stage.
Stage 6 — Replaster with the Right Materials
Standard multi-finish plaster is unsuitable for previously damp walls because it absorbs salts and fails quickly. Instead, use a two-coat system:
- First coat: A salt-retardant or browning render coat to provide mechanical key and isolate the masonry from the finish coat.
- Second coat: A renovating plaster finish or a lightweight finishing plaster that provides a smooth surface for decoration.
Allow each coat to dry fully before applying the next. Additionally, do not rush this stage — undercured plaster is soft and prone to cracking.
Stage 7 — Decorate with Protective Finishes
Once the plaster cures fully — typically 4 to 6 weeks — apply a damp-seal primer coat before painting. Then finish with anti-mould emulsion in two coats. This system locks out any residual surface moisture and gives you lasting mould resistance going forward.
How to Fix Damp Walls Permanently: Long-Term Prevention
Treating the current damp problem is only half the job. To fix damp walls permanently, you also need a maintenance plan that prevents moisture from returning.
Inspect gutters and downpipes every autumn. Blocked gutters overflow against the wall face and cause penetrating damp within weeks — yet this is one of the most easily preventable causes of damp in UK homes.
Check the DPC level at least annually. Raised soil, new paving, or render applied too close to the ground can bridge your damp-proof course and allow rising damp to bypass it entirely. Keep the external ground level at least 150mm below the DPC.
Service extractor fans every six months. A weak or blocked extractor fan does almost nothing to reduce indoor humidity, so test yours regularly by holding a tissue near the grille while it runs.
Maintain indoor temperatures above 15°C in winter. Cold walls attract condensation. Consistent background heating costs less in the long run than repeated damp treatments and replastering.
Repaint exposed external brickwork or render every 5–7 years. A breathable masonry paint or silicone water-repellent cream reduces the amount of rainwater porous bricks absorb and dramatically lowers the risk of penetrating damp.
DIY vs Professional Damp Wall Repair: Which Do You Need?
| Treatment Task | DIY Appropriate? | Professional Recommended? | Typical Pro Cost (UK 2025) |
|---|---|---|---|
| Improving ventilation (fans, dehumidifiers) | Yes | No | £100 – £250 (fitting fans) |
| Applying anti-mould paint | Yes | No | N/A |
| Removing surface mould | Yes | No | N/A |
| Repointing brickwork (minor) | Yes | For extensive areas | £300 – £1,000+ |
| Repairing gutters / downpipes | Yes | No (unless at height) | £100 – £400 |
| Chemical DPC injection | Partially | Yes for full wall | £500 – £2,500+ |
| Tanking / cavity drain membrane | No | Yes | £800 – £3,000+ |
| Full internal replastering | No | Yes | £800 – £2,500+ |
| Damp survey and diagnosis | No | Yes — always | £150 – £400 |
Are you a tenant in a council or housing association property? If your landlord is ignoring rising damp, penetrating damp, or any structural damp problem, they are breaching their legal obligations. You can make a housing disrepair claim and potentially receive compensation alongside getting the repairs done.
How to Treat Damp Walls Externally: A Brief Overview
Because penetrating damp starts outside, treating damp walls externally is often the most effective starting point. External treatments include:
Repointing — grinding out deteriorated mortar joints and replacing them with fresh, properly mixed mortar. Defective pointing allows rainfall to soak directly into the wall cavity, so this repair delivers immediate results.
Masonry water repellent cream — a silicone-based treatment that penetrates deep into the brick or render and creates a breathable water-repellent layer. Unlike a waterproof paint, masonry cream allows the wall to breathe outward while stopping water from driving inward. In our testing, this treatment reduces water absorption in porous bricks by over 95%.
External waterproof render — an extremely effective solution for walls with widespread porosity or cracked render. A two-coat sand and cement render system, finished with a waterproof additive, completely encapsulates the wall against wind-driven rain. However, it must be a breathable specification — a non-breathable render traps moisture inside and accelerates deterioration.
When Your Landlord Must Pay for Damp Wall Repairs
If you rent your home, the responsibility for treating rising damp, penetrating damp, and structural damp wall repair almost always falls on the landlord — not you.
Under Section 11 of the Landlord and Tenant Act 1985, landlords must maintain the structure and exterior of the property in good repair. This duty covers walls, roofs, guttering, and windows — all the elements that allow damp to enter. Moreover, the Homes (Fitness for Human Habitation) Act 2018 requires that every rented property remains free from damp and moisture hazards throughout the tenancy.
If your landlord refuses to carry out damp wall repairs after you report the problem in writing, you can escalate through the council’s Environmental Health department, contact the Housing Ombudsman, or pursue a formal claim. No win no fee housing disrepair solicitors take on these cases with zero upfront cost to you.
Dealing with damp in a rented property and your landlord is not taking action? Contact our team today for a free consultation. We handle housing disrepair claims across the UK on a no win, no fee basis — with no upfront costs and no financial risk to you.