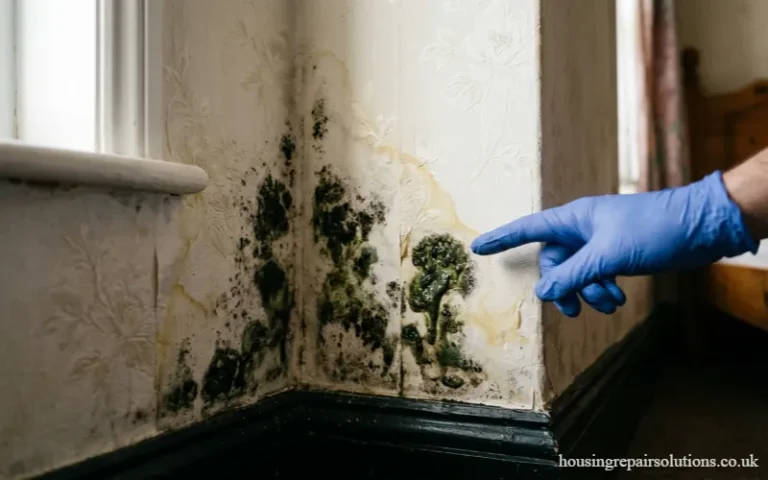
Black mould on walls is one of the most common and most mishandled problems in UK homes. Most people spray some bleach, wipe it away, and consider the job done. Within weeks, however, the mould returns — darker, wider, and harder to shift. That is because bleach does not kill mould at its roots. It merely bleaches the visible surface while spores survive deep within the plaster and regrow rapidly.
This guide shows you exactly how to get rid of mould on walls permanently, not just temporarily. You will learn the correct removal method, the best products for each surface type, natural alternatives, room-specific advice, and — critically — how to stop mould from ever coming back.
Quick Reference: Best Way to Remove Mould from Walls by Severity
| Mould Severity | Area Affected | Best Removal Method | DIY or Professional? |
|---|---|---|---|
| Minor — small spots, surface only | Under 0.5 m² | Fungicidal mould spray or white vinegar | DIY |
| Moderate — spreading patches, soft plaster | 0.5–1 m² | Biocidal wash + replaster affected area | DIY (with care) |
| Severe — widespread, strong odour, hidden growth | Over 1 m² | Professional mould remediation survey | Professional |
| Structural cause — rising damp, leaking pipes | Any size | Fix source first, then treat + replaster | Professional |
What Causes Black Mould on Walls?
Before you reach for any product, understand why the mould appeared. Treating mould without fixing its root cause guarantees it returns — often faster and in a wider area than before.
Mould grows when three conditions exist simultaneously: moisture, warmth, and an organic surface to feed on. In most UK homes, condensation provides the moisture. When warm, humid indoor air hits a cold wall surface — typically an external-facing wall — water droplets form. Over time, those droplets create the persistently damp environment mould spores need to establish themselves and spread.
Additionally, penetrating damp from leaking gutters, cracked render, or damaged roofing delivers moisture directly into wall cavities. Rising damp draws groundwater upward through masonry and deposits it on internal surfaces. Leaking pipes behind walls or beneath flooring also saturate plasterwork without any obvious visible clue. In all these cases, you must fix the water source first — otherwise, removing mould from the wall surface achieves nothing lasting.

How to Remove Black Mould from Walls: Step-by-Step
This process reflects best practice for DIY mould removal on areas smaller than one square metre. Follow each step in order, as skipping stages — particularly drying and treating — causes rapid regrowth.
Step 1 — Gather Your PPE Before You Touch Anything
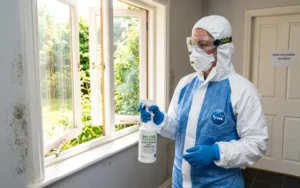
Mould releases thousands of microscopic spores into the air the moment you disturb it. Inhaling these spores triggers allergic reactions, worsens asthma, and causes respiratory infections — so protect yourself properly before starting.
You need: rubber gloves (not fabric), an FFP2 or FFP3 face mask (not a standard dust mask), protective eyewear, and old clothing you plan to wash immediately afterward. Open the window in the room fully throughout the entire process to give spores an escape route. Close the door to prevent spores spreading to other rooms.
Step 2 — Never Dry Brush or Vacuum Mould
Dry brushing mould off a wall is one of the most common mistakes people make. This action launches a cloud of spores directly into the room air, spreading the contamination to other surfaces and into your airways simultaneously.
Instead, spray a fungicidal mould treatment directly onto the affected area first and allow it to sit for the time specified on the product label. This kills the surface spores before you disturb them, making the subsequent cleaning far safer.
Step 3 — Apply a Proper Fungicidal Treatment (Not Bleach)
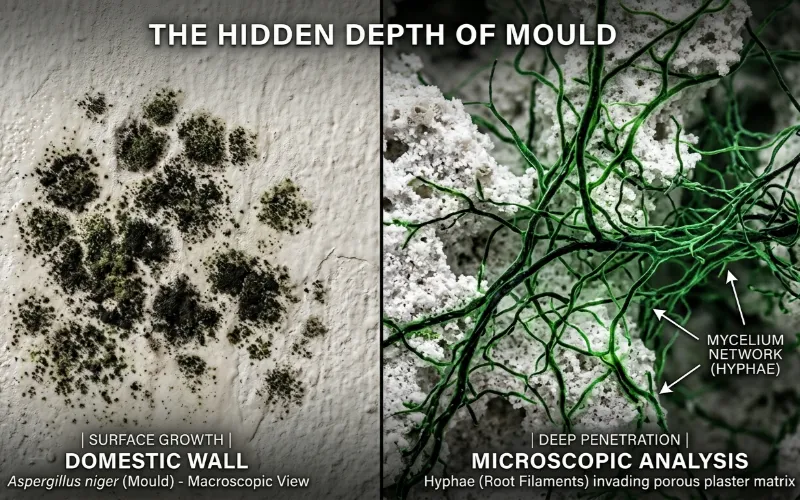
This is the most important distinction in effective mould removal. Bleach kills some surface bacteria and bleaches the visible staining, but it does not penetrate porous plaster or masonry. As a result, the mould’s root structure — the mycelium — survives beneath the surface and regrows within weeks.
A proper fungicidal biocidal wash, by contrast, penetrates into the substrate and kills mould at its root. Apply it liberally with a sponge or cloth, working it gently into the surface rather than scrubbing aggressively. Allow the product to dwell for the full contact time — typically 10 to 30 minutes — before wiping.
For moderately affected areas, apply a second coat of the fungicidal wash, allow it to dry, and then repeat.
Step 4 — Wipe Clean and Dry the Surface Thoroughly
After treatment, wipe the area with clean water on a fresh cloth, working from the outer edges of the mould patch inward to avoid spreading contamination outward. Then dry the surface as completely as possible using a dry cloth.
Immediately seal all used cloths, sponges, and disposable items in a plastic bag and remove them from the room. Wash your gloves before removing them to avoid transferring spores to your hands.
Step 5 — Assess the Plaster Underneath
Once the surface dries, press the plaster with your fingertip. Solid, firm plaster indicates the mould has not penetrated deep enough to compromise the structure. However, soft, crumbling, or powdery plaster means mould spores and hygroscopic salts have contaminated the substrate fully. In this case, cutting back the plaster to bare masonry and replastering with a fungicidal or salt-retardant render gives the only permanently effective result.
Also, inspect behind any skirting boards near the affected area. Rising damp consistently travels behind skirting before appearing on the visible wall face, so rotting or stained skirting confirms a structural damp cause rather than surface condensation.
Step 6 — Prevent Regrowth with Protective Finishes
After the wall dries fully — which can take several days for previously damp areas — apply the following layers:
- Damp-seal or stain-blocking primer to prevent any residual staining bleeding through the finish coat.
- Anti-mould paint containing fungicidal additives in at least two coats. These paints create a surface that actively inhibits mould spore germination for several years after application.
- Fungicidal additive mixed into standard emulsion paint if you prefer a specific colour — this extends the protective life of any wall colour.

Mould Removal Products: Which Works Best?
Not all mould treatments deliver the same results. Here is a clear, honest breakdown of the main options:
| Product Type | How It Works | Effectiveness | Best Used For |
|---|---|---|---|
| Bleach (diluted 1:6) | Bleaches staining, kills surface bacteria | Low — does not penetrate; mould returns fast | Not recommended for walls |
| White vinegar (undiluted) | Mild acid kills surface spores | Moderate — better than bleach, still surface-only | Minor spots, natural preference |
| Proprietary fungicidal spray | Biocide kills spores on and near surface | Good — quicker and more thorough than DIY solutions | Small to moderate patches |
| Biocidal wash concentrate | Penetrates substrate, kills at root level | Very high — the best way to kill mould on walls | All plaster, tile, wood, and painted surfaces |
| Tanking slurry / waterproof render | Physical moisture barrier for the wall surface | Very high — prevents moisture reaching the surface at all | Severe or structural damp |
Natural Mould Remover Options
For those who prefer to avoid harsh chemical treatments, several natural alternatives provide genuine mould-killing action — though they work best on minor, early-stage mould rather than established black mould outbreaks.
White vinegar kills approximately 82% of mould species. Spray it undiluted directly onto the affected area, leave it for 60 minutes, then wipe away. Because vinegar is acidic, it actively disrupts the mould’s cellular structure. Moreover, it leaves no toxic residue and presents no risk to children or pets after drying.
Baking soda solution (¼ teaspoon dissolved in 500ml of water) makes an effective supplementary spray. After removing mould with vinegar, spray the baking soda solution over the cleaned area and leave it to dry without rinsing — this leaves a mild alkaline coating that deters future spore settlement.
Tea tree oil (2 teaspoons mixed with 500ml water) kills mould spores effectively and leaves a pleasant scent. Spray it onto the mould, leave for 60 minutes, then wipe. Similarly to baking soda, leaving a thin residual coating actively deters regrowth.
Importantly, while these natural options work well for mild surface mould, persistent or returning black mould almost always points to a structural moisture problem that no surface treatment — natural or chemical — will permanently resolve.
Mould Removal Inside Walls: Hidden Mould Behind Plaster
Visible mould on a wall surface often indicates a more extensive hidden problem. Mould inside walls — growing within the cavity, behind plasterboard, or within timber studs — represents a far more serious situation than surface treatment alone addresses.
Signs that mould inside walls may be extensive include: a persistent musty smell even after surface cleaning, unexplained allergy or respiratory symptoms improving when you leave the building, walls that feel damp or cold even in dry weather, and discolouration reappearing within days of treatment.
In these situations, professional assessment with thermal imaging and moisture meters accurately maps the hidden contamination. Attempting to treat mould removal inside walls without first mapping its extent leads to incomplete remediation and guaranteed regrowth. Professional mould remediation specialists remove affected plasterboard and treat the structural timber before resealing — this is the only method that permanently eliminates hidden mould colonies.
If you rent your home and suspect mould inside walls caused by a structural defect your landlord refuses to investigate, this constitutes a serious housing disrepair issue. Read our guide on common housing disrepair issues in council and housing association properties to understand your rights.
Room-by-Room Guide: How to Get Rid of Mould in Every Room
How to Get Rid of Black Mildew in the Bathroom
Bathrooms produce more moisture than any other room in the house. Steam from showers condenses on every cool surface — walls, tiles, the ceiling, grout lines, silicone sealant, and window frames. As a result, black mildew in the bathroom establishes itself faster and spreads more aggressively than in any other room.
To remove mould from bathroom walls and tiles: Apply a fungicidal spray directly to the grout and tile surfaces, leave for 15–20 minutes, then scrub with a stiff grout brush. For silicone sealant that has gone black throughout, the only effective solution is cutting out the old sealant entirely and replacing it — no surface treatment penetrates silicone deeply enough to eliminate embedded mould.
To prevent black mildew in the bathroom from returning: Run the extractor fan during every shower and for 20 minutes afterward. Squeegee tiled walls after showering to remove 75% of surface moisture immediately. Reseal grout lines annually with a penetrating grout sealer. Leave the bathroom window open slightly between uses.
How to Get Rid of Mould in a Bedroom
Bedroom mould catches many homeowners off guard because it seems counterintuitive — bedrooms feel dry compared to bathrooms. Nevertheless, two people sleeping in a room with the door closed produce approximately two litres of water vapour overnight through respiration alone.
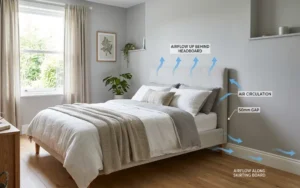
Common locations for bedroom mould: The wall directly behind the bed headboard (cold external wall, poor air circulation), the ceiling corners farthest from any ventilation, inside wardrobes built against external walls, and window frames and sills.
To remove mould in the bedroom: Apply a fungicidal spray, wipe clean, and allow the area to dry fully with the window open. Then rearrange furniture to create at least a 50mm gap between the bed, wardrobes, and any external wall. This single change restores airflow to the coldest surfaces and dramatically reduces overnight moisture buildup.
Removing Mould from the Kitchen
Kitchen walls suffer from cooking steam, washing-up vapour, and the general heat that encourages moisture to distribute throughout the room. Always use your cooker extractor hood when cooking — not just for smoke, but specifically for steam. Cover pans while boiling water to cut steam output significantly.
Apply a biocidal wash to kitchen walls showing mould, then repaint with a washable, moisture-resistant emulsion. In kitchens, washability matters as much as anti-mould properties because regular wiping extends the life of any protective coating.
Removing Mould from Different Materials
Removing Mould from Wallpaper
Wallpaper complicates mould removal because you cannot scrub aggressively without damaging the paper or causing it to bubble. Apply a fungicidal spray lightly, allow it to penetrate for 10 minutes, then dab — rather than wipe — with a damp cloth. Avoid saturating the paper with water. However, if mould has spread behind the wallpaper or penetrated the paper itself, removing and replacing it entirely and treating the bare wall underneath gives a far better long-term result.
Removing Mould from Fabric and Soft Furnishings
Take mouldy curtains, cushion covers, and soft furnishings outside before treating them to avoid spreading spores indoors. Brush away loose mould outdoors, then launder at the highest temperature the fabric tolerates. For items that cannot go in a washing machine, dry cleaning effectively kills mould spores without water damage.
Never tumble dry mouldy fabric before washing it — heat alone does not kill mould spores, and the tumble dryer spreads spores to every other item in the drum.
Cleaning Black Mould from Wood
Mould penetrates unfinished timber deeply, making surface cleaning alone ineffective. Scrub the wood surface with a stiff brush and a biocidal solution, working along the grain rather than across it. After drying completely, seal the wood with a fungicidal primer before repainting or revarnishing. For structural timber within a wall cavity showing widespread mould colonisation, a professional remediation contractor treats the area with a borate-based timber preservative that provides long-term fungicidal protection.
When to Call a Professional for Black Mould Treatment
DIY mould removal works well for contained, surface-level mould patches smaller than one square metre. Call a professional mould remediation company, however, when any of the following apply:
- The mould covers an area larger than one square metre
- A strong, persistent musty odour exists without visible mould — indicating hidden growth behind walls or under flooring
- The mould returns within weeks of treatment despite addressing ventilation
- Anyone in the household develops respiratory symptoms, worsening asthma, or persistent allergies
- You suspect structural causes such as rising damp, penetrating damp, or a plumbing leak
- The property has experienced flooding
Professional remediation specialists use thermal imaging cameras, moisture meters, and air quality testing to map contamination accurately. Furthermore, reputable companies provide a written guarantee on their remediation work — something no DIY treatment can offer.
Mould on Walls and Your Landlord’s Responsibility
If you rent your home and mould keeps returning despite your best ventilation and cleaning efforts, the cause is almost certainly structural — and structural causes make this your landlord’s legal responsibility, not yours.
Under the Homes (Fitness for Human Habitation) Act 2018, landlords must ensure their properties remain free from hazards that affect health. Mould and damp qualify as serious hazards under the Housing Health and Safety Rating System (HHSRS). Additionally, under Section 11 of the Landlord and Tenant Act 1985, landlords must maintain the structure and exterior — including roofing, guttering, walls, and plumbing — in good repair.
Document everything clearly. Photograph all mould, send written reports to your landlord by email to create a date-stamped paper trail, and note every response (or absence of response). If your landlord ignores the problem, you have the right to pursue a formal housing disrepair claim — and potentially receive compensation for damaged belongings, health impacts, and inconvenience.
Tenants affected by persistent mould caused by structural disrepair may be entitled to damp and mould compensation under UK housing law. This includes private renters, housing association tenants, and council property tenants alike.
How to Get Rid of Mould on Walls Permanently: Prevention
Removing mould successfully is only the first half of the job. Preventing regrowth requires consistent action across three areas: humidity control, ventilation, and surface protection.
- Keep indoor humidity below 55%. A hygrometer (£10–£20 from most hardware shops) measures room humidity accurately. Run a dehumidifier in any room that consistently reads above 60%.
- Ventilate every room daily. Open windows for at least 10 minutes each morning, even in winter. Trickle vents in window frames handle passive ventilation continuously without draughts.
- Heat every room consistently. Cold surfaces attract condensation and provide the moisture mould needs to grow. A background temperature of 15–18°C throughout the house prevents cold spots from forming.
- Fix damp sources promptly. Inspect guttering every autumn, check pointing on external brickwork, and have any plumbing drips repaired immediately. A slow drip behind a wall saturates metres of plasterwork within weeks.
- Apply anti-mould paint to all previously affected surfaces and high-risk rooms such as bathrooms and kitchens. Repaint every 5–7 years to maintain the fungicidal protection.
Dealing with persistent mould in a rented property that your landlord refuses to fix? Contact Housing Repair Solutions today for a free consultation. We handle mould and damp housing disrepair claims across the UK on a no win, no fee basis — no upfront cost, no financial risk.