Damp in a house is not just an eyesore — it is a genuine health hazard and a structural threat that gets worse every week you ignore it. The good news? Once you know the exact type of damp you are dealing with, fixing it is far more straightforward than most people expect.
In this guide, we cover every cause, every damp wall solution, and every proven treatment method — from quick DIY fixes for condensation spots on walls to knowing exactly when you need a professional damp-proof course.
Quick Answer: How to Get Rid of Damp (Summary)
| Damp Type | Main Cause | Key Signs | Best Solution | DIY or Pro? |
|---|---|---|---|---|
| Condensation Damp | Poor ventilation, high humidity | Black mould spots, wet windows, damp patches on internal walls | Improve ventilation, dehumidifier, extractor fans | DIY |
| Rising Damp | Failed or missing damp-proof course (DPC) | Tide-mark stains near skirting boards, peeling plaster, salt deposits | New DPC installation, replaster with salt-retardant plaster | Professional |
| Penetrating Damp | Water entering through walls, roof, or guttering | Wet patches on external-facing walls, damp coming through wall after rain | Fix guttering, repoint brickwork, apply masonry sealant | DIY or Pro |
| Plumbing Leak Damp | Burst or leaking pipes behind walls | Isolated wet patch on wall, unrelated to weather | Fix the leak, dry out with dehumidifier | DIY or Pro |
What Actually Causes Damp Walls? (Don’t Skip This Step)
Before you spend a single penny on damp wall treatment, you need to correctly identify the source. In our experience, the single biggest mistake homeowners make is treating the symptom — painting over damp patches — rather than the underlying cause. The damp always comes back.
Here are the four main culprits behind wet walls in a house:
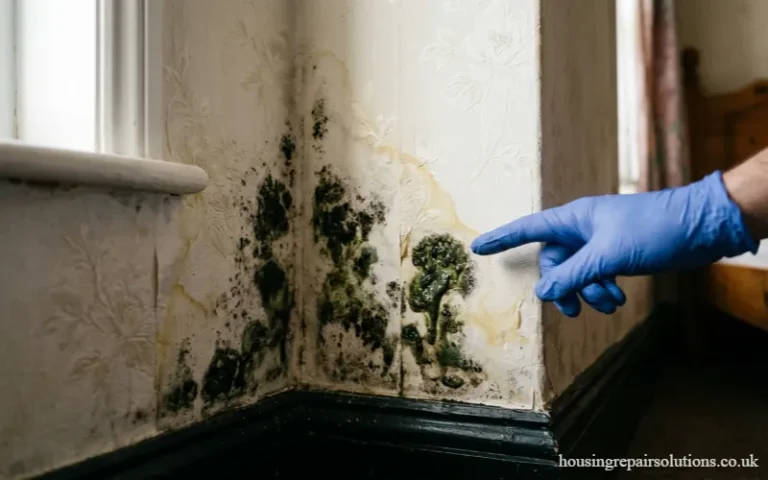
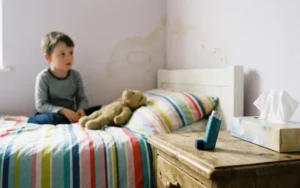
Condensation is by far the most common cause of dampness in bedroom walls, kitchens, and bathrooms. Every time you breathe, cook, shower, or dry clothes indoors, you release moisture into the air. When that warm, moist air hits a cold surface — usually an external wall or a single-glazed window — it condenses into liquid water. Over time, this creates the classic black mould speckles and damp patches on internal walls that so many UK homeowners recognise.
Rising damp occurs when groundwater is absorbed upward through porous brickwork or mortar via capillary action. A functioning damp-proof course (DPC) — a waterproof layer built into the base of walls — stops this from happening. In older properties, the DPC may be absent, damaged, or bridged by raised soil or paving. The tell-tale sign is a “tide mark” stain low on the wall, typically no higher than one metre from the floor.
Penetrating damp is caused by water entering from outside — through cracked render, failing pointing, damaged guttering, defective window frames, or porous bricks. It tends to create damp patches on the external-facing side of walls that worsen during or after heavy rain. Wet exterior walls and wet looking spots on walls that only appear after bad weather are classic signs.
Plumbing or internal leaks from burst pipes, leaking radiators, or faulty appliances like washing machines create isolated wet patches that have nothing to do with the weather outside.
How to Fix Damp Walls: Step-by-Step by Damp Type
How to Fix Condensation Damp (The Most Common Type)
Condensation is almost always a ventilation problem. Here is how we tackle it:
Step 1 — Increase ventilation immediately. Open windows daily, even in winter. If your windows have trickle vents, make sure they are open and unblocked. This single action makes a measurable difference within days.
Step 2 — Use extractor fans properly. In bathrooms and kitchens, run extractor fans during and for at least 15–20 minutes after cooking or showering. If your fan is over five years old, test it — weak suction is a hidden cause of condensation inside walls.
Step 3 — Run a dehumidifier. A good-quality dehumidifier extracts litres of moisture from the air daily. We recommend running one in the most-affected room 24/7 until the relative humidity drops below 60%. This is one of the fastest and most affordable damp wall solutions available.
Step 4 — Maintain consistent heating. Cold rooms create cold surfaces, and cold surfaces attract condensation. You do not need the heating on high — keeping every room above 15°C during winter dramatically reduces condensation damp.
Step 5 — Treat visible mould. Mix one part bleach with six parts water, or use a proprietary mould remover. Apply wearing gloves, eye protection, and a face mask. Wipe — do not brush — the mould away to avoid releasing spores. Follow up with an anti-mould paint once the surface is fully dry.
Step 6 — Avoid drying clothes on radiators. This one change alone can reduce indoor humidity levels by a significant margin. Use a vented tumble dryer or a clothes airer placed near an open window.
How to Fix Damp on Internal Walls Caused by Rising Damp
Rising damp is more serious and almost always requires professional treatment. However, understanding the process helps you make informed decisions and avoid being overcharged.
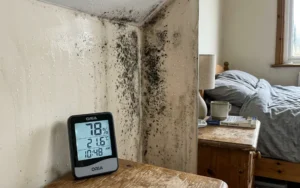
Step 1 — Confirm the diagnosis. A professional damp surveyor will use a moisture meter or thermo detector to confirm rising damp. Do not pay for a full treatment without an independent survey first.
Step 2 — Install a new chemical damp-proof course. The most common modern method involves drilling a horizontal row of holes at approximately 150mm from ground level, into every mortar joint. Damp-proofing cream or rods are injected into the holes. The active ingredients spread through the mortar over time, creating a new waterproof barrier that stops moisture from rising.
Step 3 — Remove contaminated plaster. Affected plaster absorbs salts from the rising moisture. These salts (known as hygroscopic salts) continue to attract moisture even after the DPC is installed. All damp plaster must be removed and replaced with salt-retardant renovation plaster to a height of at least 1 metre.
Step 4 — Check for DPC bridging. Sometimes the existing DPC is fine but the damp is caused by soil, paving, or render that is raised above the damp-proof course level outside. Digging away soil or cutting back render can resolve the problem completely without any chemical treatment.
Are you a tenant? If you rent your home and your landlord is refusing to fix rising damp, you are legally entitled to have it repaired. Read our guide on damp and mould compensation in the UK to understand your rights under the Housing Act 2004.
How to Stop Damp Coming Through Walls (Penetrating Damp)
Penetrating damp is a detective job. The key is finding where the water enters, because the entry point and the damp patch on the internal wall are often not in the same place — water tracks along hidden paths before appearing.
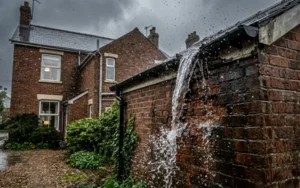
Step 1 — Inspect gutters and downpipes. Blocked or cracked guttering is one of the most common causes of wet exterior walls and penetrating damp in UK homes. Go outside during rainfall and watch where water overflows.
Step 2 — Check pointing and render. Cracked or eroded mortar between bricks allows water to penetrate. Repointing with fresh mortar is a cost-effective fix. Cracked render should be repaired and repainted with a breathable, waterproof masonry paint.
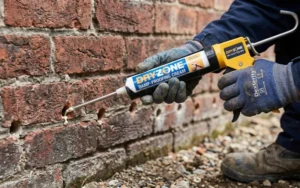
Step 3 — Apply a masonry water-repellent cream. A silicone-based masonry protection cream is an excellent damp wall solution for porous brickwork. It repels water while still allowing the wall to breathe, which is critical — fully waterproof coatings can trap moisture and cause more damage.
Step 4 — Inspect window and door frames. Gaps where mortar has shrunk away from window or door frames are a surprisingly common source of moisture inside walls. These can be sealed with exterior-grade flexible filler or silicone.
Step 5 — Check the roof and flashings. Damp patches on internal walls near chimneys or at ceiling level often indicate cracked or poorly fitted lead flashing between the chimney stack and roof. This is a job for a roofer.
How to Treat Damp Walls Internally After the Source Is Fixed
Once you have addressed the root cause, here is how to restore your walls:
- Allow the wall to dry fully — this can take weeks or months for serious cases. Use a dehumidifier to speed up the process.
- Remove all affected plaster using a bolster chisel and hammer.
- If rising damp was involved, replaster with salt-retardant renovation plaster.
- Once fully dry, apply a damp seal or stain-blocking primer to prevent old staining bleeding through your new paint.
- Finish with anti-mould emulsion paint for long-term protection.
- Reinstall new skirting boards if the originals have rotted.
Room-by-Room Damp Prevention Guide
Dampness in Bedroom Walls
Bedrooms are surprisingly vulnerable to condensation. We breathe out approximately one litre of moisture per night while sleeping. Keep bedroom doors closed when sleeping but ensure trickle vents are open. Move furniture away from external walls to allow air circulation — this single change often eliminates black mould spots on bedroom walls.
Bathroom and Kitchen Damp
These rooms produce the most moisture. Install or upgrade extractor fans to ones with a humidity sensor so they activate automatically. Use sealed tiling and grout around baths and showers, and reseal annually.
Basement and Ground-Floor Damp
Ground-floor walls are most susceptible to rising damp. Check the external DPC line regularly and ensure the ground level outside remains 150mm below it.
Damp Walls and Your Health: Why You Should Never Ignore It
In our experience helping thousands of UK tenants and homeowners, damp is consistently underestimated as a health risk. Mould spores released from damp walls are linked to:
- Respiratory conditions, including asthma and bronchitis
- Allergic reactions, particularly in children and the elderly
- Severe fatigue, headaches, and joint pain in cases of heavy mould exposure
- Reduced immunity in people with underlying conditions
Beyond health, damp drives up heating costs significantly. When moisture penetrates thermal insulation, it can reduce insulation efficiency by up to 50%, meaning your boiler works much harder to maintain the same temperature.
When Is Your Landlord Responsible for Damp?
If you rent your home from a council, housing association, or private landlord, the responsibility for fixing structural damp — including rising damp, penetrating damp, and failed damp-proof courses — lies with your landlord under UK law.
Under the Housing Act 2004 and the Homes (Fitness for Human Habitation) Act 2018, landlords are legally required to maintain properties free from hazards that affect health and safety. Damp and mould qualify as serious hazards under this legislation.
If your landlord is ignoring the problem, you have the right to make a formal housing disrepair claim — and potentially claim compensation for damage to belongings and health impacts. You can find out more about common housing disrepair issues and your rights as a tenant on our dedicated resource pages.
At Housing Repair Solutions, we handle damp and mould claims on a no win, no fee basis — meaning there is no financial risk to you. Contact our team today if your landlord has failed to act on damp problems in your home.
Damp Prevention: How to Stop Damp Coming Back
Treating damp is only half the job. Preventing recurrence is equally important. Based on experience dealing with hundreds of damp cases across the UK, these are the most effective long-term strategies:
- Maintain a background heat of at least 15°C in all rooms throughout winter. Cold rooms are damp rooms.
- Run a dehumidifier in any room where condensation is persistent, especially in winter.
- Inspect gutters and downpipes every autumn before the wet season starts. A blocked gutter is one of the most common causes of penetrating damp in UK homes.
- Check your DPC level annually. Make sure no soil, concrete, or render has been added outside that bridges your damp-proof course.
- Repoint and repaint exterior brickwork every 5–10 years to keep the building envelope watertight.
- Service extractor fans and clean filters every 6 months to maintain efficient moisture extraction.
- Do not over-stuff wardrobes or push furniture against external walls — air needs to circulate freely to prevent moisture inside walls from building up.
Damp Treatment Cost Guide (UK 2026)
| Treatment | Typical DIY Cost | Typical Professional Cost |
|---|---|---|
| Dehumidifier (purchase) | £80 – £250 | N/A |
| Anti-mould paint | £10 – £30 per litre | N/A |
| Mould removal spray | £5 – £15 | N/A |
| Extractor fan replacement | £30 – £80 (parts) | £100 – £200 incl. fitting |
| Masonry sealant application | £20 – £60 (materials) | £200 – £600+ (wall size dependent) |
| Chemical DPC injection | Not recommended DIY | £500 – £2,500+ (property size dependent) |
| Full replastering (damp areas) | £200+ (materials) | £800 – £2,500+ |
| Gutter repair/replacement | £20 – £60 (materials) | £100 – £400 |
If you are a tenant dealing with damp, mould, or any form of housing disrepair that your landlord is refusing to fix, Housing Repair Solutions can help. We operate on a no win, no fee basis across the UK. Get in touch with our team today for a free consultation.