Damp and mould are two of the most damaging — and most common — problems in UK rental homes. Left untreated, they do not just look unsightly. They destroy walls, rot fixtures, damage belongings, and cause serious respiratory health problems. In severe cases, they lead to costly housing disrepair claims against landlords who have failed in their duty of care.
Whether you are a tenant trying to prevent dampness from taking hold, or you are already dealing with black patches spreading across your bedroom wall, this guide gives you everything you need: causes, treatments, prevention strategies, your legal rights, and when to take action.
Quick Answer: How to Eliminate Mould and Treat Damp in Your Home
| Problem | Solution | Urgency |
|---|---|---|
| Black mould on walls | Fungicidal wash + anti-mould paint | Immediate |
| Condensation on windows | Improve ventilation, wipe daily, use trickle vents | Ongoing |
| Dampness in house from condensation | Extractor fans, dehumidifier, open windows | Ongoing |
| Rising damp | Professional damp-proof course (DPC) inspection | Urgent |
| Penetrating damp through external walls | Seal cracks, repair guttering, waterproof coating | Urgent |
| Mould in bedroom or bathroom | Reduce humidity, improve airflow, treat with fungicide | Immediate |
| Structural damp from landlord neglect | Report in writing, document, pursue housing disrepair claim | Immediate |
Understanding the Three Types of Dampness in a House
Before you can treat damp properly, you need to identify what type you are dealing with. Using the wrong solution wastes time, money, and effort.
1. Condensation Damp (Most Common)
Condensation is the most common type of damp. It is caused by too much moisture in the air and happens mainly during cold weather. It is the most likely cause of black mould in your home.
It shows up as black pinpoint spots on external walls, in corners, behind wardrobes, and around window frames — appearing on cold surfaces and in places where there is little movement of air.
Cooking, showering, breathing, and drying clothes all release moisture. Two people showering, cooking, and washing dishes every day can add about 50 litres of moisture to the air in a week.
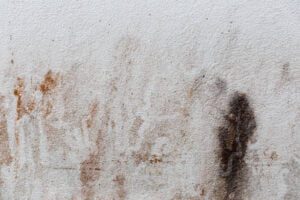
2. Rising Damp
Rising damp occurs when moisture from the ground rises through the walls of your home. The most common cause is a defective damp-proof course — a horizontal barrier typically made of plastic or bitumen installed to prevent moisture from rising through the structure.
It usually leaves a tidemark low down on the wall, below one metre from the floor. Unlike condensation damp, mould will rarely be seen with rising damp, and only in the early stages.
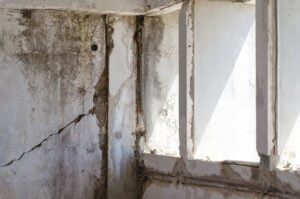
3. Penetrating Damp (Through External Walls)
Penetrating damp is the result of water seeping through an external wall — for example, because of a missing tile or slate, spilling from a blocked gutter, or penetrating around window frames. This type of dampness gets worse after rain and usually appears as a damp patch that looks and feels wet to the touch.
Understanding which type you have matters enormously. A dehumidifier will help with condensation but will do nothing for rising damp or penetrating damp through external walls.
How to Eliminate Mould on Walls: Step-by-Step Treatment
If mould is already visible, you need to treat it before it spreads further. Here is the correct process:
Step 1: Do Not Brush or Vacuum Mould
Avoid disturbing mould by brushing or vacuuming because this can increase the risk of breathing problems. It releases spores into the air that you then inhale.
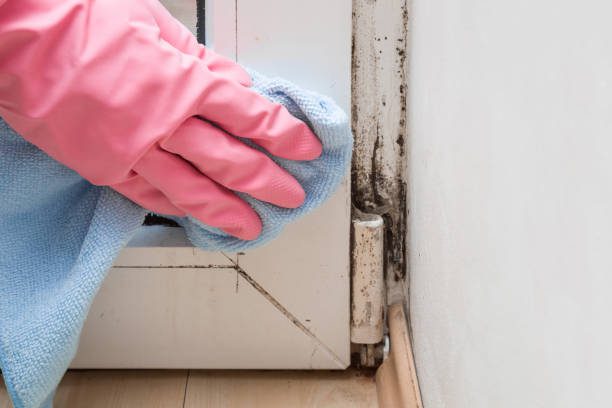
Step 2: Apply a Fungicidal Wash
To kill and remove mould, wipe down walls and window frames with a fungicidal wash that carries a Health and Safety Executive approval number. Follow the manufacturer’s instructions carefully.
For clothes and soft furnishings: dry-clean mildewed clothes and shampoo carpets.
Step 3: Treat Beyond the Visible Patch
Mould spores can exist in walls up to a metre around the visible patch. To kill invisible mould spores, treat an area at least one metre wider than the mould patch with a spray containing bleach. Repeat the treatment every time it reappears.
Step 4: Use Anti-Mould Paint After Treatment
Once the area is dry and clean, redecorate using a good quality fungicidal paint to help prevent mould recurring. This is your mould prevention paint — specifically designed to create a surface that resists future spore growth. Standard emulsion will not provide the same protection.
Step 5: Address the Root Cause
The only lasting cure for mould is to get rid of moisture. Paint to stop mould and fungicidal washes are treatments, not cures. If you do not fix the underlying dampness, the mould will return.
Damp Wall Treatment: How to Fix Damp Walls for Each Cause
| Damp Type | Damp Wall Solution | DIY or Professional? |
|---|---|---|
| Condensation | Improve ventilation, heating, reduce moisture sources | DIY |
| Mould on walls (early) | Fungicidal wash + anti-mould treatment | DIY |
| Mould on walls (advanced) | Fungicidal wash + replaster + anti-mould paint | Professional |
| Rising damp | Damp-proof course injection or replacement | Professional |
| Penetrating damp (minor cracks) | Seal with exterior filler or caulk | DIY |
| Penetrating damp (structural) | Repointing, roof repair, guttering replacement | Professional |
| Damp through external walls | Weatherproof coating or cavity wall insulation | Professional |
How to Stop Mould on Walls: Ventilation Is Everything
The single most effective long-term strategy to stop mould and prevent damp on walls is proper ventilation. According to a Rentokil Property Care report, 44% of rented properties had no extractor fan in the bathroom, and a further 31% said the bathroom had no window either. That is a recipe for dampness.
Use Extractor Fans Properly
Install extractor fans in kitchens and bathrooms and ensure they vent externally. Run them during and for at least 15 minutes after cooking or showering. Clean filters regularly — a clogged fan is almost useless.
Open Windows Daily
Open your windows for at least 15 minutes daily, even during colder months, to allow damp air to escape. Use trickle vents if your windows have them.
Keep Interior Doors Closed When Cooking or Showering
Close the kitchen and bathroom door when these rooms are in use, even if your kitchen or bathroom has an extractor fan. Closing the door will help prevent moisture reaching other rooms — especially bedrooms, which are often colder and more likely to get condensation.
Position Furniture Away From Walls
Positioning furniture away from walls promotes air circulation and can prevent moisture build-up. Wardrobes pushed flat against external walls are one of the most common spots for hidden mould growth.
How to Stop Condensation on Walls: Heating and Insulation
Cold surfaces cause condensation. The warmer your walls and surfaces, the less condensation forms — which directly reduces your risk of mould.
Maintain Consistent Background Heating
A cold home is more likely to be a damp home. Condensation forms more quickly when your home is cold because cold air can hold less moisture than warm air. The recommended room temperature is 18 degrees — or 21 degrees if you have young children, are elderly, or have a health condition.
Avoid turning heating off entirely at night. Low-level background heating should be continuous, as short bursts of heat may not result in a suitable rise in surface temperatures.
Insulate Your Home
Proper insulation is one of the most effective damp solutions available because it keeps wall surfaces warmer. Focus on loft insulation first (the cheapest and most impactful), then cavity wall insulation for external walls, and finally floor insulation for ground-floor rooms.
Damp proofing external walls with cavity wall insulation significantly reduces the risk of penetrating damp reaching the inner wall.
Insulate Pipes
Uninsulated pipes can freeze and attract condensation in colder weather. Lagging pipes prevents freezing and reduces condensation drips.
How to Control Humidity and Treat Dampness in Walls
Keeping indoor humidity between 40% and 60% is the target. Above 60%, mould growth accelerates significantly.
Use a Dehumidifier
A dehumidifier is one of the most practical damp solutions for rooms prone to moisture — particularly basements, bathrooms, and bedrooms. By extracting moisture from the air, dehumidifiers help maintain a drier indoor environment, discouraging the conditions that lead to damp and mould growth.
Electric dehumidifiers with humidity sensors will automatically maintain your target level.
Monitor Humidity With a Hygrometer
A hygrometer costs very little and gives you a real-time reading of indoor humidity. If you see readings consistently above 60%, ventilation and heating adjustments are needed immediately.
Stop Drying Clothes Indoors on Radiators
Drying clothes on radiators is one of the biggest contributors to condensation damp in UK homes. Drying clothes on radiators releases significant moisture. Use a heated clothes airer or dry clothes in a well-ventilated room with a window open.
If you must dry indoors, use a tumble dryer vented externally, or run a dehumidifier in the same room with the door closed and a window slightly open.
How to Stop Dampness Coming Through Walls: Structural Fixes
If your damp issue is structural rather than condensation-based, you need to address the physical route that water is using to enter your home.
Fix Leaks and Check Your Roof
Check for missing or damaged tiles. Inspect your loft for leaks or damp insulation. A single missing tile can allow water ingress for months before it becomes visibly apparent inside the property.
Clear Gutters and Downpipes Regularly
Blocked gutters and pipes can cause water to seep into your walls. Regularly clear leaves and debris to ensure proper drainage. This is one of the most overlooked causes of penetrating damp, particularly after autumn.
Seal External Wall Cracks
Look for peeling paint, cracks in the render, or gaps in mortar joints. Repoint damaged brickwork and seal any gaps around window frames with exterior-grade caulk.
For more severe cases of water coming through external walls, apply a breathable waterproof coating or silicone-based water repellent. This allows moisture vapour out while preventing rain from penetrating in.
Avoid Bathroom Mould With Better Sealing
To avoid mould in the bathroom, check grout and sealant around baths, showers, and sinks regularly. Cracked or missing sealant allows water behind tiles, creating hidden damp. Re-seal annually as a minimum, and replace grout that shows any signs of blackening.
How to Treat Damp Walls When Your Landlord Is Responsible
Here is where it becomes critically important for tenants to understand the difference between dampness caused by their own lifestyle and dampness caused by structural failure — because that distinction determines who is legally responsible.
Under the Landlord and Tenant Act 1985 and the Homes (Fitness for Human Habitation) Act 2018, your landlord has a legal duty to keep the structure, roof, guttering, pipes, heating systems, and exterior of the property in proper repair. If rising damp, penetrating damp, or severe condensation caused by poor insulation or inadequate ventilation systems is making your home uninhabitable, that is not your responsibility to fix — it is theirs.
Awaab’s Law (October 2025): A Major Shift in Tenant Protection
New rules now in force protect social housing tenants from emergency hazards and damp and mould. Social landlords are forced to fix emergency health and safety hazards within 24 hours of reporting and must investigate significant damp and mould within 10 working days of being notified, then make properties safe in five working days.
Awaab’s Law currently only applies to social housing tenants — council and housing association homes — and does not yet apply to private rented homes. However, the government has confirmed it intends to extend equivalent protections to the private rented sector in due course.
What this means for you: If you are a social housing tenant and your landlord has ignored reported damp or mould, they are now in breach of a legal obligation — not just a contractual one. This substantially strengthens your position in any housing disrepair claim.
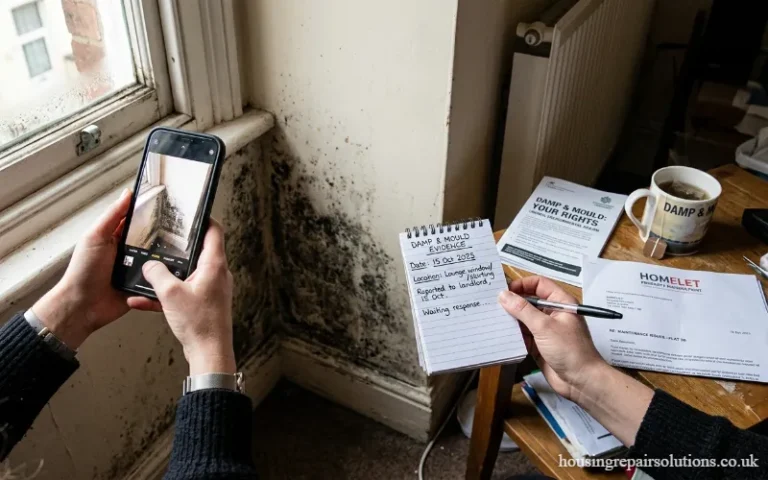
What to Do If Your Landlord Ignores Damp and Mould
| Step | Action |
|---|---|
| 1 | Report the issue to your landlord in writing — email or letter — with the date |
| 2 | Photograph all affected areas with timestamps |
| 3 | Keep records of all landlord responses (or non-responses) |
| 4 | Give a reasonable deadline for action (at least 14 days for non-emergencies) |
| 5 | If ignored, contact your local authority Environmental Health team |
| 6 | Consider pursuing a no win no fee housing disrepair claim |
If your landlord has failed to maintain your property and that failure has caused dampness, mould, or damage to your health or belongings, you may be entitled to compensation and a court-ordered repair without paying any legal fees upfront. You can read more about how this works in our guide to no win no fee solicitors for housing disrepair.
Damp Solutions by Room: A Practical Comparison
| Room | Most Common Cause | Best Damp Solution | Anti-Mould Treatment |
|---|---|---|---|
| Bathroom | Condensation from showers | Extractor fan, open window, wipe surfaces | Fungicidal sealant + anti-mould paint |
| Kitchen | Steam from cooking | Extractor fan, pan lids, close door | Anti-mould treatment on ceiling |
| Bedroom | Cold external walls + condensation | Background heating, move furniture from walls | Mould prevention paint, dehumidifier |
| Living room | Poor ventilation, cold corners | Trickle vents, background heat | Fungicidal wash + redecoration |
| Basement | Ground moisture, rising damp | Tanking membrane, sump pump | Professional treatment required |
| Hallway | Cold air drafts, exterior door | Draught excluders, insulation | Fungicidal wash |
Mould Prevention Paint and Anti-Mould Treatments: What Actually Works
Once you have treated existing mould and addressed the root cause, redecorating correctly makes a real difference to long-term prevention.
Anti-mould paint contains fungicidal additives that inhibit future mould spore growth. It is not a substitute for fixing the underlying moisture problem, but it is an effective final layer of protection. Look for products specifically labelled as fungicidal or mould-resistant — use an approved fungicidal paint or wallpaper paste after treatment to help prevent mould from reoccurring.
Anti-mould treatment sprays are useful for maintenance — spray on grout, window frames, and sealant lines periodically to keep mould from returning.
Damp proof paint for internal walls provides a basic moisture barrier and can help in areas prone to light condensation, though it will not stop rising or penetrating damp.
For damp proofing walls externally, silicone water-repellent treatments are applied to brickwork and render to reduce water absorption without affecting the breathability of the wall.
Final Thoughts: Prevention Is Far Cheaper Than a Claim
Preventing damp and mould from taking hold in the first place costs very little — a dehumidifier, an extractor fan, consistent background heating, and the habit of wiping down window condensation each morning. The cost of letting it go unchecked is far higher: damaged walls, health problems, destroyed belongings, and potentially a long dispute with a landlord who refuses to act.
If you are a tenant dealing with damp that your landlord is responsible for and has failed to fix, do not suffer in silence. Document everything, report it in writing, and explore your legal options. You have the right to live in a safe, habitable home — and the law is increasingly on your side.
For personalised advice on whether you have a valid housing disrepair claim, contact our team at Housing Repair Solutions today.